Yamaha R6 Forum: YZF-R6 Forums banner

Clutch and friction plate order?

30K views 12 replies 5 participants last post by  Matroskin  
#1 ·
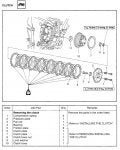
Last season i burnt out my clutch and ordered a used set of clutch and friction plates from a new bike that was wrecked. Measured plates and their all perfect on the high side of the dimension tolerance. Now in the users manual showing the installation shows that there are 7 "black" plates 1 "brown" plate and 1 "purple plate".... being used plates they all look close to the same. I know that 8 plates have a groove at the top and 1 plate does not and that is the "brown" plate.
Is there much significance to the order of the friction plates???
Anyone with help or advice on this would help me a lot
 
#3 · (Edited)
This confuses the hell out of me. I have read several times about odd plates and I saw that when I pulled my clutch on my 2002 R6. However if you look in the manual or the fiche for the 2001, it just shows 8 friction plates. All the same part number. On the clutch plates it does show a different one for the one that goes closest to the hub (#7 in the attached picture from the manual).

My clutch works, but it seems to disengage very early (and the cable isn't too tight). I assume there is something wrong in there, but I have no idea what the problem is.
 

Attachments

#6 · (Edited)
on 3RD GEN bikes (no idea of earlier, it's been awhile) .. the inner most colored friction (purple) will not have the same grooves on the teeth that all the others do. I would put them in the order the manual dictates, with all the teeth lined up but OFFSET the last friction (brown) from the stack of black frictions and inner purple friction (as stated to do in the manual).

Also, ensure you put the metals in the proper order. All the inner metals should be the same size, then you make up the stack height (42.something to 43mm) with the outer 2 metals. Those outer metals come in 3 sizes. I like to put the metals with the sharp side (machined side) facing out, and smooth rounded teeth side facing in, the way the stack compresses together.
 
#8 · (Edited)
it can be a bit confusing but you need to choose the optional metals that go on the outside to make up the proper stack height. There is no option on fibers, you get the purple, brown, and 7 blacks. What i would do is order all standard metals (8 of them) but also order one 1.6mm metal, and a 2.3mm metal. That way your covered. If your stack height is too short with all 2.0mm plates, remove one standard metal and put the 2.3mm metal on the outside. It's $15 extra to get the 2 optional thickness plates.

Do you have a manual? it is outlined in detail, and i suggest ya follow it to a "T". Including measureing the clutch spring length (if too short and sacked out the clutch could slip). Those are not expensive. I just put new ones in one of my race bikes this weekend. The aftermarket ones that come with my EBC clutch kits are not as strong.
 
#9 ·
Yep, thank you
I've got the manual, but I never deal with clutch plates replacement, so I've never read this part of the manual :) Sorry for stupid questions
So, if I ofder Clutch KIT, I dont need to order additional metal plates, because new springs included in the KIT. Am I right?
 
#10 · (Edited)
The only kit i would get is the full EBC kit .I would not worry about the springs that come with that kit for a street bike, you should be fine using them. They just are not strong enough for a built motor on race fuel in my opinion (no..fact, it was slipping last week ..LOL)
 
#12 ·
yes, i use oem yamaha clutch parts most of the time.. no issues. but the ebc stuff works very well too and may cost less. I have one ebc kit in one of the 2 bikes now.
You wont' take the basket apart, but the pressure plate will have to come off, and it's held on by the springs..
DO NOT loose the tiny thin washers that rest at the bottom of the pressure plate cavities. they sit at the bottom of the spring. It's easy to loose those.
The most difficult part is getting the outer cover back on while lining up the pressure plate pin.