Yamaha R6 Forum: YZF-R6 Forums banner
Status
Not open for further replies.
201 - 220 of 456 Posts
Discussion starter · #201 ·
d60:00
d61: 39
d62:1
Ok, 60 should be 00, that is good. 62 is showing 1 code that can be erased from the history. 61 is showing you the only code stored, 39.

39 - Open circuit detected in a primary injector.

I'd say that's a fluke, clear it and wait and see if it returns. These bikes have a great diagnostic system though, you can actually use 36, 37, 38, 39 to individually pulse each injector 5 times are 1 sec intervals. Unless you are close enough to hear the injectors though, the test will just put a bunch of fuel in your cylinders...

*edit* I used an 07 FSM, let me know if your year is different, I'll double check and see if the numbers are the same, assuming I have that years FSM.
 
Save
06/07 should be the same (I have an 06)

I hope it's a fluke, either way I capped off the exposed wire so the error could have been stored from it touching the metal pan around the battery and sparking.

I won't know until I take it back to the track in another 3-4 weeks. I cleared the codes for now, let it idle and run in gear for a while and no codes or engine light.

I will probably bring it back to my tuner to finish the dyno stuff in between (102 hp to almost 112 and he didnt charge me a dime because he didnt finish it, only worked with the AFRs and AT tables because of software issues). So I'd feel terrible to stiff him, plus it'd be nice to see what it can do with a fully finished tune).
 
well.. got a personal best today. Had a ~12mph head wind and was "moist" out, all in all i ran a 11.1 (last year ran a 11.2) but my MPH was lower then last time (was averaging 125-128mph) (blaiming the wind and not my tune).


Save
Discussion starter · #204 ·
Those are pretty good times. The local tracks around here, won't let cars and bikes run together, interesting to see they do that there.
 
Save
11.1 is boss. We can't run against cars here either
 
Save
i tried to either run alone or against another bike... i cant hear shit against a car. I was running 125-128 consistently last time out on no race gas or advanced timing, so maybe it was the head wind and sucked for air quality. i was talking to a few locals that raced bikes, they said their MPH and ET was off as well... So, all in all not a bad day, got some more race time, only had the bike (1st one ever) for a year now.

I think i am going to look into a MPS dry nitrous kit.
 
Save
Nice run, it's hard to tell what your launch rev is at with the car beside you :p

The R6 can really pull if you get an awesome launch, once you get that down you'll see a noticeable drop in your times.

I haven't had a chance to install my APE cam chain tensioner (I'm getting the rattle rattle rattle from the right side of the bike). But with the Smogs installed correctly it is sounding relatively better; I was noticing a louder sound before.

Race weekend is in 3 weeks so I won't have a better feel of the bike until then. Will keep you guys posted.
 
Discussion starter · #208 · (Edited)
------------------------------------------------------------------
FlashTune Interface vs PCV / Bazzaz
------------------------------------------------------------------
After messing with the Flash Interface from FlashTune I can say the device has many advantages over the "piggy back" systems.

So who is this recommended for? I would say anyone could use this, beginners are going to have a bit of a learning curve. This has several advantages over a Power Commander (and Bazzaz for that matter).

Advantages -

-No extra devices, or wiring to install or run.
-Reduced Weight (not that a PCV is heavy)
-Controls all 8 injectors (unlike the PCV only doing 4, without the SFM) (Bazzaz does all 8)
-Install is much easier compared to the PCV or Bazzaz
-Frees up throttle restrictions.
-Allows increase in ignition timing.
-Supports quick shifter
-More tuneability

Disadvantages -

-Allows changes that could be dangerous.
-Flashing anything can be potentially risky. (Reasonably safe, but should something go wrong you could lose an ECM)
-More tuning options can result in a steeper learning curve to new users
-Complete lack of documentation, or help files from manufacturer. (At least the folks at Flash Tune are willing to help answer questions when you call them)
-Attempts to "hide" program to prevent the user from backing up software.
-Users are essentially the beta testers of a device that is still under development.
-Currently no AutoTune option.
-Changes can't be applied in real time like the PCV, you must shut the bike off and wait 5 minutes for it to flash.

Despite all the risks, the advantages are very clear. However users must realize that just importing a Power Commander map won't result in a perfect running bike. This is just like a Power Commander or Bazzaz unit, you must tune it to your exact bike, a downloaded map won't be right.

------------------------------------------------------------------
Navigation
------------------------------------------------------------------
| Why do I need a fuel controller | How they work | Do I need a fuel controller | PCV vs. Bazzaz | Other options | My Two Cents | FlashTune Interface vs PCV / Bazzaz | FAQ Index |
 
Save
Discussion starter · #209 · (Edited)
------------------------------------------------------------------
Factory ECM Limitations
------------------------------------------------------------------

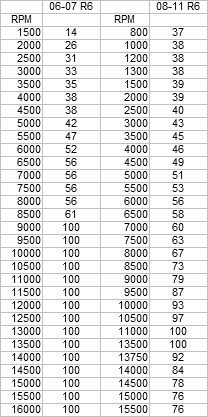
The factory ECM has several limitations on it. All the maps I'm posting are for the 06-07 models, as I have an 07. The 08+ are actually quite a bit more restrictive though.

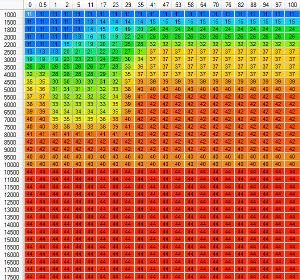
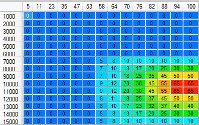
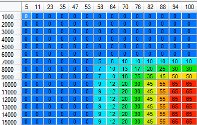
This is the 06-07 and 08-11 R6 factory throttle maps for the 100% throttle position. As you can see the 08+ is seriously limited, especially compared to the 06-07.

Image


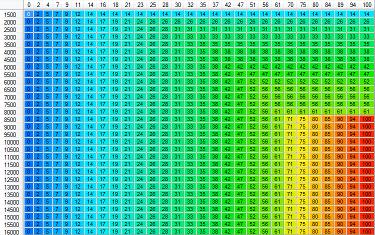
This is the stock throttle map 06-07 R6:

Full Resolution Image
Image


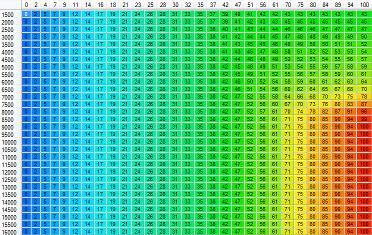
This is the "race" throttle map, that is included with the software (Should be similar to the YEC). You can edit this map to be any values you want:

Full Resolution Image
Image


The changes to the map seem mild, but it actually makes a noticeable difference. I was actually surprised to see the 06-07 R6 had a much less restrictive throttle map from the factory than the R1s and the 08+ R6.

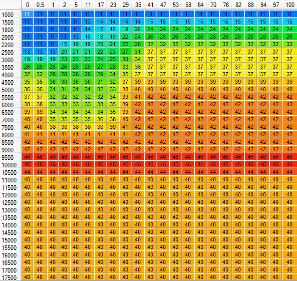
This is the stock ECU timing 06-07 R6, all values BTDC:

Full Resolution Image
Image


These are the values they recommend and supply for bikes running 91+ octane fuel.

Full Resolution Image
Image


I believe these timing advances are still a little on the conservative side, however for good reason. The quality of fuels today is all over the map, with little to no consistency. Even with these bikes having a knock sensor, detonation at the higher end of the RPM band could be catastrophic.

According to the "stock" flash file, the secondary injectors are actually not used as much as I would have thought.

Full Resolution Image
Image


Again, this is "their" recommendation, included, which increase the proportion of the secondary injectors:

Full Resolution Image
Image


------------------------------------------------------------------
Navigation
------------------------------------------------------------------
| Warning | FlashTune Interface vs PCV / Bazzaz | Factory ECM Limitations | FlashTune Software | Software Versions | Using / Installing the Device | Troubleshooting / Connection Issues | Timing Recommendations | FAQ Index |
 
Save
Discussion starter · #210 · (Edited)
------------------------------------------------------------------
FlashTune Software
------------------------------------------------------------------

Now I will admit, just my first impression of the device was not very good. A lack of documentation and software is my issue. First of all there is no documentation, no online help, no help files, and no software included at all. You can download the software, however, you must be connected to the internet to complete the install. The install file you download is only a ~ 400 kbs, then it downloads 22 MB. Then on top of this, the install purposely "hides" the program on your computer to try and prevent you from locating the files to even "create" an offline backup of this software. Perhaps I'm overly paranoid, but after shelling out the money for something that is somewhat "untested" I want to be sure I can still use this device even if the company goes under, or their web site goes off line. I was able to procure an off line version of the program, which is the only reason I did not return the device before even trying it.

This advice has tons of potential to anyone willing to take the time to adjust and tweak it as needed. However I believe they are more marketing this towards people who just want to import a Power Commander map and are happy enough with a "in the ball park" tune. As we all know, downloaded maps are not an ideal setup.

Now I actually typed up a list of questions that I had and called Flash-Tune to ask them. After a couple phone calls I believe I reasonably understand how this thing works, and what the settings do, despite a complete lack of documentation.

First lets start with the main screen, which is probably all most users would ever use.

Full Resolution Image
Image


Select ECU Base Map File - These are maps you've created, and maps they include. The include the stock ECM file, a pump gas, 91+ pump gas, and maps for two different types of race fuels.

Set YCC-T Throttle Options - This allows you to choose the stock throttle map, or the "race" map. The race throttle map can be edited.

Reduce Engine Braking - This reduces the braking effect that letting all the throttle has. The max setting just about makes the bike feel like it's coasting when you letting off the throttle rather than slowing down quickly. This can take some getting used to, as reduced engine braking can help prevent unsettling the suspension in the curves, however it's amazing how much you can rely on the engine braking to slow you down.

High Load (TPS) Fuel Map Bias - This is where you choose how soon the bike switches to the high load map. When you move to the right of "stock" it will change to a percentage. This percentage is a TPS value at which the high load map takes over. At stock this point can be random, as it's a calculated value. Going all the way to the left will result in only the "low load" map being used, which is NOT recommended. Going full right will actually disable the O2 sensor, and the low load map. This means the high load map is being used all the time.

Import Power Commander 3 or 5 Fuel Table - This is where you can import a power commander map into the ECM. This only changes the high load map. The low load map remains untouched. The software actually does a pretty good job of converting the maps over and blending the values into the high load maps from what I've seen so far.

Cooling Fan - This lets you change the point at which your cooling fan turns on.

YCC-I Intake - Lets you adjust the RPM for the YCC Intake. (08+ models)

Quickshifter - This is for enabling the quick shifter on the ECM. (Additional parts and harness required)

US Model - I believe this actually has to do with the immobilizer, but I need to verify this!

Disable EXUP - Disables the EXUP valve.

RevLimiter - Adjust the rev limiter RPM.

Idle Speed - Adjust the idle speed.

Once you have selected the options, "Flash Wizard" walks you through the process of flashing. These steps must be performed in the correct order.

-Disconnect both connectors from the ECM
-Plug flash interface into the computer
-Connect the device to a 12 volt power supply
-Plug flash interface into the ECU.
-Click Ok
-Flashing takes 3-5 minutes.

Ok across the top you'll notice the drop down box that says "Viewing", this is where you can go to edit the maps prior to flashing. Again since there is no documentation and the titles are less than meaningful, I had to rely on my phone discussion with Flash Tune.

Fuel Map Load vs RPM - This is the low load fuel map.

Full Resolution Image
Image


Fuel TPS vs RPM - This is the high load fuel map.

Full Resolution Image
Image


On both these maps, you can select areas to increase or decrease. There is also a "blend" feature similar to using the Bazzaz software, however from the little I've tried it, it works much better. Editing these maps is similar to editing a map in the Power Commander or Bazzaz software. At the top you can change from viewing "actual value" to view as a percentage, which will let you see things in a format consistent with the Power Commander and Bazzaz software (viewing percentages of increase or decrease over stock).

Ignition Timing deg BTDC - This one is actually self explanatory, just ignition timing. Be extremely careful when modifying values in here, I would not recommend making changes with a complete understanding of what you are doing. I would strongly recommend you use a pre-set map that included with the software.

Full Resolution Image
Image


Injector Proportioning - This is the proportioning between the primary and secondary injectors.

Full Resolution Image
Image


YCC-T Throttle By Wire - This is the throttle map. RPM values on the left, TPS values across the top, the chart is what the bike is actually doing.

Full Resolution Image
Image


------------------------------------------------------------------
Navigation
------------------------------------------------------------------
| Warning | FlashTune Interface vs PCV / Bazzaz | Factory ECM Limitations | FlashTune Software | Software Versions | Using / Installing the Device | Troubleshooting / Connection Issues | Timing Recommendations | FAQ Index |
 
Save
Discussion starter · #211 · (Edited)
------------------------------------------------------------------
Using / Installing the Device
------------------------------------------------------------------

As for using the device it's pretty straight forward. However first realize there are some risks. You are flashing to the memory of the ECM, and should something go wrong, you may have a completely destroyed, unusable ECM. This is not the time to use an unreliable machine. Also the flash interface comes with alligator clips on the end for you to clip to the battery for a 12+ volt supply. I'm going to strongly recommend you go ahead and use a regular 2-wire connector. Most bikes use standard 2-wire trailer plugs for battery tenders. This is a perfect way to hook the interface into a power source without worrying about an alligator clip jumping off the battery mid flash (possibly destroying your ECM).

Image


As for getting to the ECM the only thing you need to do is remove the seat, nothing else needs to be removed.

Image


------------------------------------------------------------------
Navigation
------------------------------------------------------------------
| Warning | FlashTune Interface vs PCV / Bazzaz | Factory ECM Limitations | FlashTune Software | Software Versions | Using / Installing the Device | Troubleshooting / Connection Issues | Timing Recommendations | FAQ Index |
 
Save
Discussion starter · #212 · (Edited)
------------------------------------------------------------------
Warning
------------------------------------------------------------------

Folks, I'm not sure if I made it clear enough, there are some risks with flashing your ECM.

There seem to be some R1s particularly which have not gone so well with the flash. There are some issues mentioned elsewhere, but here is one thread you should read. Update on the issue. - (It has been resolved)

When flashing your ECM, it is possible to destroy it. Those who have had the flash issues, have not been able to just flash back to stock.

Second this device is still being developed, and you are essentially "Beta" testers. Which means you will go through the good and the bad, as things are worked out.

We are essentially the "early adopters", and there is a lot of good things you can do with this device. So far after many flashes, I have had all positive results. Your results may vary, and you definitely need to think of the liability issues if you plan on flashing other peoples ECM to recoup some of your costs.

------------------------------------------------------------------
Navigation
------------------------------------------------------------------
| Warning | FlashTune Interface vs PCV / Bazzaz | Factory ECM Limitations | FlashTune Software | Software Versions | Using / Installing the Device | Troubleshooting / Connection Issues | Timing Recommendations | FAQ Index |
 
Save
Discussion starter · #213 · (Edited)
------------------------------------------------------------------
Warning
------------------------------------------------------------------

Folks, I'm not sure if I made it clear enough, there are some risks with flashing your ECM.

There seem to be some R1s particularly which have not gone so well with the flash. There are some issues mentioned elsewhere, but here is one thread you should read. Update on the issue. - (It has been resolved)

When flashing your ECM, it is possible to destroy it. Those who have had the flash issues, have not been able to just flash back to stock.

Second this device is still being developed, and you are essentially "Beta" testers. Which means you will go through the good and the bad, as things are worked out.

We are essentially the "early adopters", and there is a lot of good things you can do with this device. So far after many flashes, I have had all positive results. Your results may vary, and you definitely need to think of the liability issues if you plan on flashing other peoples ECM to recoup some of your costs.

------------------------------------------------------------------
Factory ECM Limitations
------------------------------------------------------------------

The factory ECM has several limitations on it. All the maps I'm posting are for the 06-07 models, as I have an 07. The 08+ are actually quite a bit more restrictive though.

This is the 06-07 and 08-11 R6 factory throttle maps for the 100% throttle position. As you can see the 08+ is seriously limited, especially compared to the 06-07.

Image


This is the stock throttle map 06-07 R6:

Full Resolution Image
Image


This is the "race" throttle map, that is included with the software (Should be similar to the YEC). You can edit this map to be any values you want:

Full Resolution Image
Image


The changes to the map seem mild, but it actually makes a noticeable difference. I was actually surprised to see the 06-07 R6 had a much less restrictive throttle map from the factory than the R1s and the 08+ R6.

This is the stock ECU timing 06-07 R6, all values BTDC:

Full Resolution Image
Image


These are the values they recommend and supply for bikes running 91+ octane fuel.

Full Resolution Image
Image


I believe these timing advances are still a little on the conservative side, however for good reason. The quality of fuels today is all over the map, with little to no consistency. Even with these bikes having a knock sensor, detonation at the higher end of the RPM band could be catastrophic.

According to the "stock" flash file, the secondary injectors are actually not used as much as I would have thought.

Full Resolution Image
Image


Again, this is "their" recommendation, included, which increase the proportion of the secondary injectors:

Full Resolution Image
Image


------------------------------------------------------------------
FlashTune Software
------------------------------------------------------------------

Now I will admit, just my first impression of the device was not very good. A lack of documentation and software is my issue. First of all there is no documentation, no online help, no help files, and no software included at all. You can download the software, however, you must be connected to the internet to complete the install. The install file you download is only a ~ 400 kbs, then it downloads 22 MB. Then on top of this, the install purposely "hides" the program on your computer to try and prevent you from locating the files to even "create" an offline backup of this software. Perhaps I'm overly paranoid, but after shelling out the money for something that is somewhat "untested" I want to be sure I can still use this device even if the company goes under, or their web site goes off line. I was able to procure an off line version of the program, which is the only reason I did not return the device before even trying it.

This advice has tons of potential to anyone willing to take the time to adjust and tweak it as needed. However I believe they are more marketing this towards people who just want to import a Power Commander map and are happy enough with a "in the ball park" tune. As we all know, downloaded maps are not an ideal setup.

Now I actually typed up a list of questions that I had and called Flash-Tune to ask them. After a couple phone calls I believe I reasonably understand how this thing works, and what the settings do, despite a complete lack of documentation.

First lets start with the main screen, which is probably all most users would ever use.

Full Resolution Image
Image


Select ECU Base Map File - These are maps you've created, and maps they include. The include the stock ECM file, a pump gas, 91+ pump gas, and maps for two different types of race fuels.

Set YCC-T Throttle Options - This allows you to choose the stock throttle map, or the "race" map. The race throttle map can be edited.

Reduce Engine Braking - This reduces the braking effect that letting all the throttle has. The max setting just about makes the bike feel like it's coasting when you letting off the throttle rather than slowing down quickly. This can take some getting used to, as reduced engine braking can help prevent unsettling the suspension in the curves, however it's amazing how much you can rely on the engine braking to slow you down.

High Load (TPS) Fuel Map Bias - This is where you choose how soon the bike switches to the high load map. When you move to the right of "stock" it will change to a percentage. This percentage is a TPS value at which the high load map takes over. At stock this point can be random, as it's a calculated value. Going all the way to the left will result in only the "low load" map being used, which is NOT recommended. Going full right will actually disable the O2 sensor, and the low load map. This means the high load map is being used all the time.

Import Power Commander 3 or 5 Fuel Table - This is where you can import a power commander map into the ECM. This only changes the high load map. The low load map remains untouched. The software actually does a pretty good job of converting the maps over and blending the values into the high load maps from what I've seen so far.

Cooling Fan - This lets you change the point at which your cooling fan turns on.

YCC-I Intake - Lets you adjust the RPM for the YCC Intake. (08+ models)

Quickshifter - This is for enabling the quick shifter on the ECM. (Additional parts and harness required)

US Model - I believe this actually has to do with the immobilizer, but I need to verify this!

Disable EXUP - Disables the EXUP valve.

RevLimiter - Adjust the rev limiter RPM.

Idle Speed - Adjust the idle speed.

Once you have selected the options, "Flash Wizard" walks you through the process of flashing. These steps must be performed in the correct order.

-Disconnect both connectors from the ECM
-Plug flash interface into the computer
-Connect the device to a 12 volt power supply
-Plug flash interface into the ECU.
-Click Ok
-Flashing takes 3-5 minutes.

Ok across the top you'll notice the drop down box that says "Viewing", this is where you can go to edit the maps prior to flashing. Again since there is no documentation and the titles are less than meaningful, I had to rely on my phone discussion with Flash Tune.

Fuel Map Load vs RPM - This is the low load fuel map.

Full Resolution Image
Image


Fuel TPS vs RPM - This is the high load fuel map.

Full Resolution Image
Image


On both these maps, you can select areas to increase or decrease. There is also a "blend" feature similar to using the Bazzaz software, however from the little I've tried it, it works much better. Editing these maps is similar to editing a map in the Power Commander or Bazzaz software. At the top you can change from viewing "actual value" to view as a percentage, which will let you see things in a format consistent with the Power Commander and Bazzaz software (viewing percentages of increase or decrease over stock).

Ignition Timing deg BTDC - This one is actually self explanatory, just ignition timing. Be extremely careful when modifying values in here, I would not recommend making changes with a complete understanding of what you are doing. I would strongly recommend you use a pre-set map that included with the software.

Full Resolution Image
Image


Injector Proportioning - This is the proportioning between the primary and secondary injectors.

Full Resolution Image
Image


YCC-T Throttle By Wire - This is the throttle map. RPM values on the left, TPS values across the top, the chart is what the bike is actually doing.

Full Resolution Image
Image


------------------------------------------------------------------
Using / Installing the Device
------------------------------------------------------------------

As for using the device it's pretty straight forward. However first realize there are some risks. You are flashing to the memory of the ECM, and should something go wrong, you may have a completely destroyed, unusable ECM. This is not the time to use an unreliable machine. Also the flash interface comes with alligator clips on the end for you to clip to the battery for a 12+ volt supply. I'm going to strongly recommend you go ahead and use a regular 2-wire connector. Most bikes use standard 2-wire trailer plugs for battery tenders. This is a perfect way to hook the interface into a power source without worrying about an alligator clip jumping off the battery mid flash (possibly destroying your ECM).

Image


As for getting to the ECM the only thing you need to do is remove the seat, nothing else needs to be removed.

Image


------------------------------------------------------------------
Navigation
------------------------------------------------------------------
| Warning | FlashTune Interface vs PCV / Bazzaz | Factory ECM Limitations | FlashTune Software | Using / Installing the Device | Troubleshooting / Connection Issues | Timing Recommendations | FAQ Index |
 
Save
Discussion starter · #214 ·
As you can tell, I started incorporating the FlashTune Flash Interface information into the FAQ.
 
Save
Discussion starter · #215 · (Edited)
------------------------------------------------------------------
Installing a PCV
------------------------------------------------------------------
Start by removing the seat. There are two bolts under the seat in the rear, just lift up on the rear corners, you'll see them. Be careful when reinstalling these bolts, they use inserts in the frame that can break loose and freely spin. Those bolts don't need to be super tight.

Next remove the plastic side panels. They have Phillips head screws in them, and it is very important whenever removing a Phillips head screw to use the correct size Phillips screw driver. Make sure the screw driver fits tightly. Or if you are like me, and got tired of buying new panels every time they broke, cut the zip ties. Once the screw is removed slide the panel forward, it will just come off.

Image


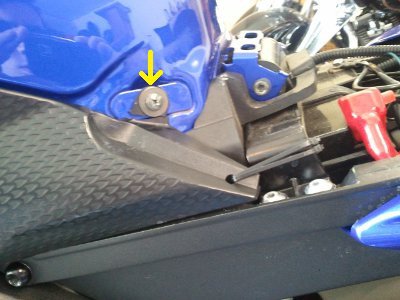
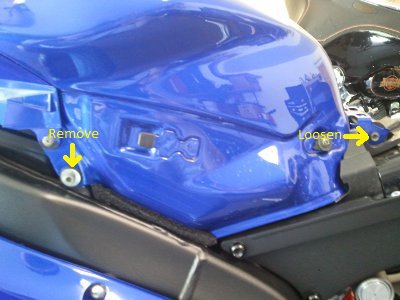
Next remove the side bolts on the gas tank. Loosen the back bolt but do NOT remove it yet.

Image


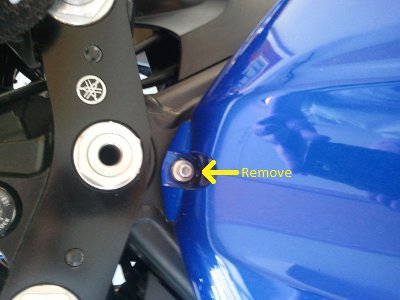
Next remove the top bolt

Image


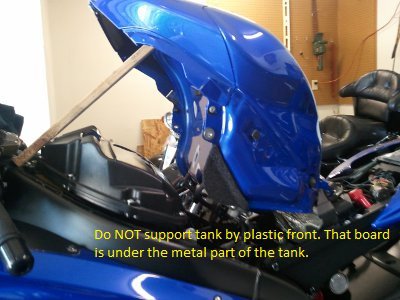
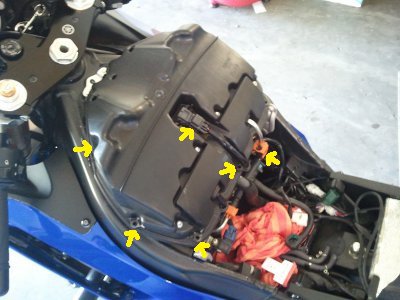
Now carefully lift up the tank, careful not to over extend any wiring, or hoses. If you are doing this by yourself, you can use a board to support the tank. Do NOT put the board under the plastic front part of the tank, place it on the metal part of the tank only!

Image


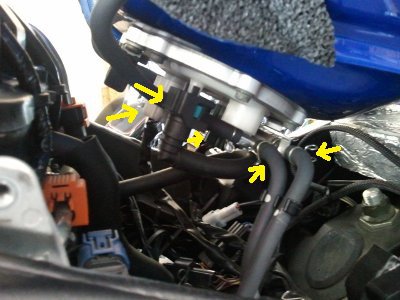
Remove the two electrical connectors, one white one brown. Then remove the two vent lines, those spring clamps are pretty weak, you can remove them by hand. Finally remove the fuel line, notice the cover over the green buttons, this slides back to expose those buttons. Then squeeze the green buttons and pull down. Do NOT force anything, the output on the fuel pump only plastic! WARNING, the fuel system is pressurized. Have a large rag already under the tank, to soak up any fuel that sprays out or leaks out. Also gas may spray out, as it's under pressure, safety glasses couldn't hurt. Also remember you can pulse the injectors in DIAG mode, to help relieve the pressure.

Image


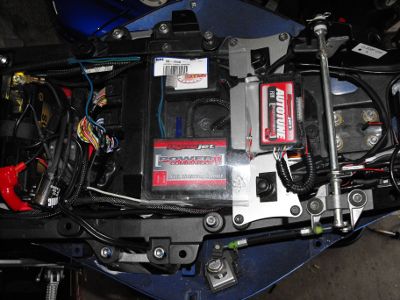
Most people place the PCV in the tail, if you do this you will need to remove the tail. I mounted mine on top of the ECM, and leave the USB cable plugged and in the tail. Notice my "rain shields" for the PCV, AutoTune, and SpeedoHealer. They are water resistant, but I chose to add little pieces of plastic to avoid any issues later down the road. Also note in that location I had to clearance the aluminum bracket back there to clear the USB cable on the PCV.

Image


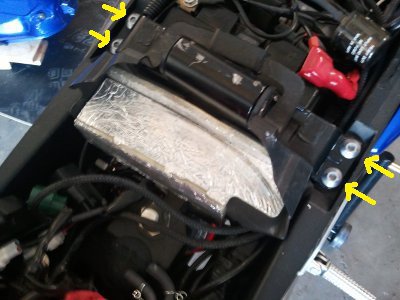
You will also have to remove the tank support bracket, to route the wiring for the PCV.

Image


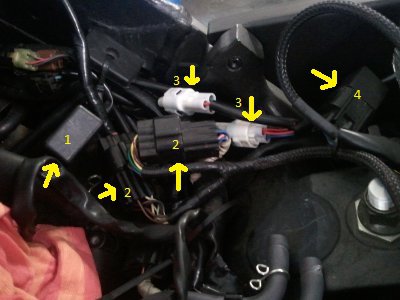
Pretty much all the wiring you need to tap into is all in one spot.

1. O2 Simulator, Optional, not all bikes use this.
2. This is the main injector harness, you just unplug it and plug the PCV into those plugs.
3. Is the speed sensor harness, there are two because my bike has a speedo healer on it. I only mention this, as a way to tap into the speed sensor for different maps for each gear on the PCV if you plan on running an AutoTune.
4. EXUP Eliminator plug.

Image


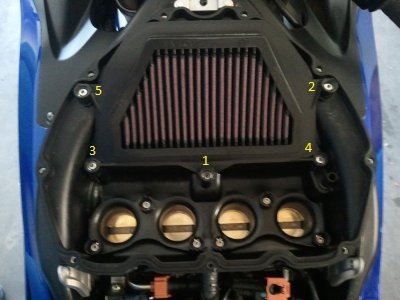
Now while you have the tank off, it is the perfect time to clean or install a new air filter. Start by removing the screws all the way around the air box. Next unplug the atmospheric pressure sensor. Finally disconnect the fuel line to the secondary injectors, it is removed just like the fuel pump one. Then lift off the box top, note there is still a wire running into it, so just lay the box on the bike. If you have disconnected the fuel pump, you already mostly depressurized the system, but have a rag ready, some gas will still drip out of the this line when you disconnect it.

Image


There is a correct order to screw down the new air filter:

Image


------------------------------------------------------------------
Navigation
------------------------------------------------------------------
| Smog Block Off Plate Install | Header Install | PCV Install | New Grips | Repacking a 06+ R6 GYTR slip-on
| FAQ Index |
 
Save
Discussion starter · #216 · (Edited)
------------------------------------------------------------------
Cliff Notes
------------------------------------------------------------------
You don't want to read, I get it.

I want to make my bike louder.
A slip on will do nothing to make your bike louder, unless you get a mid pipe or header. Don't believe me, pull your slip on off entirely and start the bike up.

Do I need a power commander?
Any bike will run without one. General rule of thumb, just a slip on does NOT need one. If you run a mid pipe or header then it is recommended.

Which mid pipe should I get?
The MJS, Olson, M4 are all good designs, and will be similar.

Which slip on should I get?
It doesn't matter, get whatever you like the looks of, they all do the same thing.

I want the best bang for my buck
Than skip exhaust, and do sprockets. Most people prefer -1/+2.

Should I get a mid-pipe or full exhaust?
Either, they both accomplish the same thing.

Ok, now seriously take a few minutes and read some more in this FAQ, there is a lot more to learn about this stuff.

------------------------------------------------------------------
Navigation
------------------------------------------------------------------
| FAQ Index |
 
Save
Re: R6 FAQ, Fuel Controllers, Exhaust, Maps Please help me.

Hello, I have a 08 R6 with only 3 thousand miles, the exhaust was cut off like a slash cut Harley pipe. I have since put the stock exhaust slip on, on, and have tried to hook up the cables. I have no clue how to adjust them. I can only get 68 hp on the Dyno, this bike has the stock head pipe and cat still on it. It was bought this way, with the cut off junk. It has no low end power, could anyone please help me out. Thanks
 
Discussion starter · #218 ·
Is your check engine light on?

The only adjustment you can make to the EXUP is adjusting the free play in the cables. The free play should be 1.5 mm or less. So essentially no free play. Make sure aren't hooked up backwards, since one is longer I don't think you would have done this though.

Disconnecting the EXUP entirely at this point might help you trouble shoot the problem though. The EXUP helps with low end power but it doesn't make a 40+ HP difference, you are short a lot of horsepower. If your engine light is on though that would explain it.
 
Save
Discussion starter · #220 · (Edited)
------------------------------------------------------------------
dIAG Mode
------------------------------------------------------------------
The R6 has a very advanced self diagnostic system. Anytime your check engine light comes on you can use it to figure out why it's on.

To enter DIAG Mode:
- Press and hold the Select and Reset buttons on the gauge cluster.
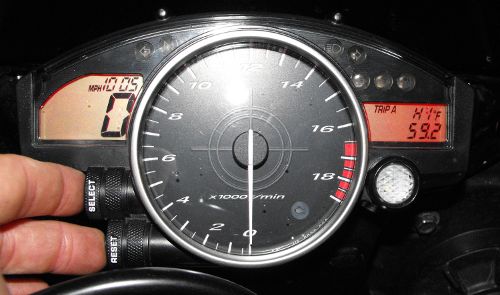
- Turn the key on (kill switch in run position). (Still holding both Select and Reset buttons) Your gauge cluster should have H1 up in the right hand corner:

Image


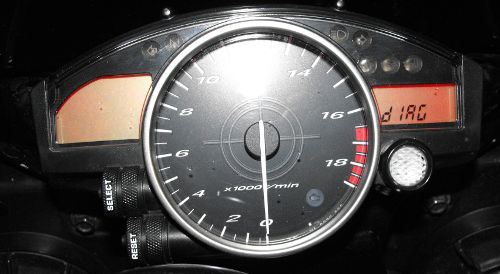
- Continue to hold the Select and Reset buttons until dIAG appears on the gauge cluster (Should happen within 8-10 seconds).

Image


- When dIAG appears on the gauge cluster, release both the Select and Reset buttons.
- Now to "activate" diagnostic mode, you once again need to press and hold both the Select and Reset buttons, except this time the screen should change within a couple seconds.
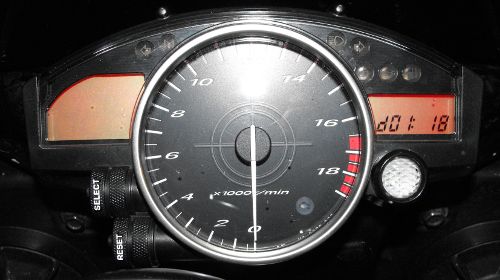
- At this point you should see d01 : XX, d01 is the test mode for the TVS sensor.

Image


- To exit dIAG mode, simply turn the key off.

------------------------------------------------------------------
Diagnostic Codes
------------------------------------------------------------------
Once in diagnostic mode, these "self-tests" are available. Many of these will just display the value the sensor is currently reading. Others however you are able to activate those items by flipping the kill switch. For example flipping the kill switch on 36, will activate the Primary Injector #1, 5 times, once a second.

01 - TVS signal, 12-21 - 97-106
02 - Atmospheric Pressure
03 - Intake Air Pressure
05 - Intake Air Temperature
06 - Coolant Temperature
07 - Vehicle Speed Pulse
08 - Lean Angle Sensor, 0.4-1.4 Upright, 3.7-4.4 Overturned
09 - Fuel System Voltage
13 - TVS Signal 2, 9-23 - 94-106
14 - TPS Signal, 12-22 - 97-107
15 - TPS Signal 2, 10-24 - 95-109
20 - Kickstand Switch
21 - Neutral Switch
30 - Coil #1
31 - Coil #2
32 - Coil #3
33 - Coil #4
36 - Primary Injector #1
37 - Primary Injector #2
38 - Primary Injector #3
39 - Primary Injector #4
40 - Secondary Injector #1
41 - Secondary Injector #2
42 - Secondary Injector #3
43 - Secondary Injector #4
48 - Air Induction Solenoid
50 - Fuel Injection Relay
51 - Radiator Fan Motor Relay
52 - Headlight Relay
53 - EXUP Servo
60 - EE Prom Fault Cylinder Number
61 - Code History, Codes will cycle every two seconds if more than one.
62 - Erase Codes
63 - Code Reinstate
70 - Control Number


------------------------------------------------------------------
Fault Codes
------------------------------------------------------------------
11 - Cylinder Identification Sensor
12 - Crankshaft Position Sensor
13 - Intake Air Pressure Sensor open or short circuit
14 - Intake Air Pressure Sensor hose system malfunction
15 - Throttle Valve Sensor open or short circuit
17 - EXUP Servo motor open or short circuit
18 - EXUP Servo motor stuck
19 - Kick stand switch open or short circuit
20 - Atmospheric Pressure Sensor and Intake Pressure Sensor voltage differ greatly
21 - Coolant Temperature Sensor open or short circuit
22 - Air Temperature Sensor open or short circuit
23 - Atmospheric Pressure Sensor open or short circuit
24 - O2 Sensor Signal
30 - Lean Angle Sensor
33 - Coil #1 open or short circuit
34 - Coil #2 open or short circuit
35 - Coil #3 open or short circuit
36 - Coil #4 open or short circuit
39 - Open or Short circuit in primary injector
40 - Open or Short circuit in secondary injector
41 - Lean Angle Sensor open or short circuit
42 - Speed Sensor, or Neutral Switch
43 - Power Supply to Injectors and Fuel Pump
44 - Error with ECU PROM
46 - Charging System
50 - Faulty ECM Memory
59 - Throttle Position Sensor open or short circuit
60 - Throttle Servo motor open or short circuit
Er-1 - No ECU Signal
Er-2 - No ECU Signal
Er-3 - Data from ECU not received correctly
Er-4 - Non-registered data received from meter

------------------------------------------------------------------
Maintenance Schedule
------------------------------------------------------------------
The FSM contains a much more complete maintenance schedule, I'm leaving out things like check tread depth, and brake operation. I'm going to list only the major stuff, as I believe you already know to check brake fluid level on a regular basis.

Air Filter - Every 4000 Miles, Check, Clean, Replace as necessary.
Antifreeze - Every 16000, or 24 months.
Brake Fluid - Replace / Flush every 2 years.
Brake Hoses - Replace every 4 years.
Chain - Every 500 Miles Lube, or after washing the bike, or riding in the rain. Adjust as necessary, 1.38-1.77" chain slack.
Control Cables - Lube every 4000
Engine Oil - Every 4000 Miles Change
Oil Filter - Every 8000 Miles, I would recommend changing the filter every oil change.
Spark Plugs - Check Every 4000 miles, Replace every 8000 miles, Gap 0.024-0.028"
Steering Bearings - Check every 4000, repack with grease every 12000.
Swing Arm Bearings - 16000 Miles Repack with grease.
Valve Adjustment - Every 26600
Wheel Bearings - Every 4000 Miles Check.

------------------------------------------------------------------
Navigation
------------------------------------------------------------------
| dIAG Mode | Diagnostic Codes | Fault Codes | Maintenance Schedule | FAQ Index |
 
Save
201 - 220 of 456 Posts
Status
Not open for further replies.
You have insufficient privileges to reply here.