Yamaha R6 Forum: YZF-R6 Forums banner
Status
Not open for further replies.
221 - 240 of 456 Posts
Discussion starter · #221 · (Edited)
------------------------------------------------------------------
dIAG Mode
------------------------------------------------------------------
The R6 has a very advanced self diagnostic system. Anytime your check engine light comes on you can use it to figure out why it's on.

To enter DIAG Mode:
- Press and hold the Select and Reset buttons on the gauge cluster.
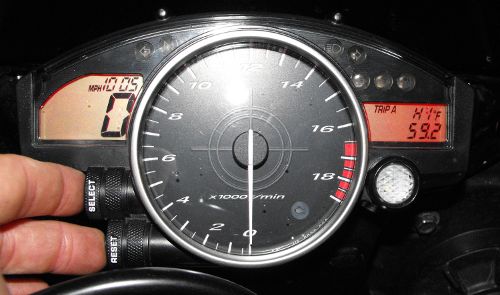
- Turn the key on (kill switch in run position). (Still holding both Select and Reset buttons) Your gauge cluster should have H1 up in the right hand corner:

Image


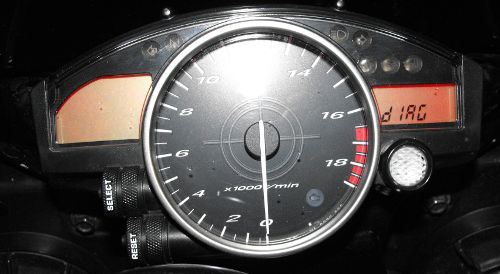
- Continue to hold the Select and Reset buttons until dIAG appears on the gauge cluster (Should happen within 8-10 seconds).

Image


- When dIAG appears on the gauge cluster, release both the Select and Reset buttons.
- Now to "activate" diagnostic mode, you once again need to press and hold both the Select and Reset buttons, except this time the screen should change within a couple seconds.
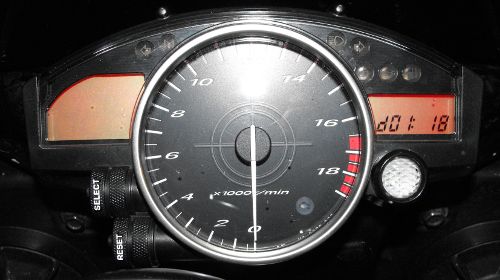
- At this point you should see d01 : XX, d01 is the test mode for the TVS sensor.

Image


- To exit dIAG mode, simply turn the key off.

------------------------------------------------------------------
Navigation
------------------------------------------------------------------
| dIAG Mode | Diagnostic Codes | Fault Codes | Maintenance Schedule | Adjusting the TPS | FAQ Index |
 
Save
Discussion starter · #222 · (Edited)
------------------------------------------------------------------
Diagnostic Codes
------------------------------------------------------------------
Once in diagnostic mode, these "self-tests" are available. Many of these will just display the value the sensor is currently reading. Others however you are able to activate those items by flipping the kill switch. For example flipping the kill switch on 36, will activate the Primary Injector #1, 5 times, once a second.

01 - TVS signal, 12-21 - 97-106
02 - Atmospheric Pressure
03 - Intake Air Pressure
05 - Intake Air Temperature
06 - Coolant Temperature
07 - Vehicle Speed Pulse
08 - Lean Angle Sensor, 0.4-1.4 Upright, 3.7-4.4 Overturned
09 - Fuel System Voltage
13 - TVS Signal 2, 9-23 - 94-106
14 - TPS Signal, 12-22 - 97-107
15 - TPS Signal 2, 10-24 - 95-109
20 - Kickstand Switch
21 - Neutral Switch
30 - Coil #1
31 - Coil #2
32 - Coil #3
33 - Coil #4
36 - Primary Injector #1
37 - Primary Injector #2
38 - Primary Injector #3
39 - Primary Injector #4
40 - Secondary Injector #1
41 - Secondary Injector #2
42 - Secondary Injector #3
43 - Secondary Injector #4
48 - Air Induction Solenoid
50 - Fuel Injection Relay
51 - Radiator Fan Motor Relay
52 - Headlight Relay
53 - EXUP Servo
60 - EE Prom Fault Cylinder Number
61 - Code History, Codes will cycle every two seconds if more than one.
62 - Erase Codes
63 - Code Reinstate
70 - Control Number

------------------------------------------------------------------
Navigation
------------------------------------------------------------------
| dIAG Mode | Diagnostic Codes | Fault Codes | Maintenance Schedule | Adjusting the TPS | FAQ Index |
 
Save
Discussion starter · #223 · (Edited)
------------------------------------------------------------------
Fault Codes
------------------------------------------------------------------
11 - Cylinder Identification Sensor
12 - Crankshaft Position Sensor
13 - Intake Air Pressure Sensor open or short circuit
14 - Intake Air Pressure Sensor hose system malfunction
15 - Throttle Valve Sensor open or short circuit
17 - EXUP Servo motor open or short circuit
18 - EXUP Servo motor stuck
19 - Kick stand switch open or short circuit
20 - Atmospheric Pressure Sensor and Intake Pressure Sensor voltage differ greatly
21 - Coolant Temperature Sensor open or short circuit
22 - Air Temperature Sensor open or short circuit
23 - Atmospheric Pressure Sensor open or short circuit
24 - O2 Sensor Signal
30 - Lean Angle Sensor
33 - Coil #1 open or short circuit
34 - Coil #2 open or short circuit
35 - Coil #3 open or short circuit
36 - Coil #4 open or short circuit
39 - Open or Short circuit in primary injector
40 - Open or Short circuit in secondary injector
41 - Lean Angle Sensor open or short circuit
42 - Speed Sensor, or Neutral Switch
43 - Power Supply to Injectors and Fuel Pump
44 - Error with ECU PROM
46 - Charging System
50 - Faulty ECM Memory
59 - Throttle Position Sensor open or short circuit
60 - Throttle Servo motor open or short circuit
Er-1 - No ECU Signal
Er-2 - No ECU Signal
Er-3 - Data from ECU not received correctly
Er-4 - Non-registered data received from meter

------------------------------------------------------------------
Navigation
------------------------------------------------------------------
| dIAG Mode | Diagnostic Codes | Fault Codes | Maintenance Schedule | Adjusting the TPS | FAQ Index |
 
Save
Discussion starter · #224 · (Edited)
------------------------------------------------------------------
Maintenance Schedule
------------------------------------------------------------------
The FSM contains a more complete maintenance schedule, I'm leaving out things like check tread depth, and brake operation. I'm going to list only the major stuff, as I believe you already know to check brake fluid level on a regular basis.

Air Filter - Every 4000 Miles, Check, Clean, Replace as necessary.
Antifreeze - Every 16000, or 24 months.
Brake Fluid - Replace / Flush every 2 years.
Brake Hoses - Replace every 4 years.
Chain - Every 500 Miles Lube, or after washing the bike, or riding in the rain. Adjust as necessary, 1.38-1.77" chain slack.
Control Cables - Lube every 4000
Engine Oil - Every 4000 Miles Change
Oil Filter - Every 8000 Miles, I would recommend changing the filter every oil change.
Spark Plugs - Check Every 4000 miles, Replace every 8000 miles, Gap 0.024-0.028"
Steering Bearings - Check every 4000, repack with grease every 12000.
Swing Arm Bearings - 16000 Miles Repack with grease.
Valve Adjustment - Every 26600
Wheel Bearings - Every 4000 Miles Check.

------------------------------------------------------------------
Navigation
------------------------------------------------------------------
| dIAG Mode | Diagnostic Codes | Fault Codes | Maintenance Schedule | Adjusting the TPS | FAQ Index |
 
Save
Discussion starter · #225 · (Edited)
------------------------------------------------------------------
Sprocket / Ratio Changes
------------------------------------------------------------------
Arguably the best bang for your buck when it comes to modifications to your bike is sprockets. With sprockets you are able to change your gear ratio.

Sprockets are listed in tooth counts, Front Sprocket / Rear Sprocket. Stock is 16 / 45 for the 06+ R6. To find out the ratio, divide the two sprocket counts together.

Stock - 16 / 45 - 2.81
-1/+0 - 15 / 45 - 3.00
-1/+2 - 15 / 47 - 3.13

As a general rule of thumb, going down one in the front, is the same as going up 3 in the rear. The most popular swap is -1/+2. As you can see it's roughly an 11% increase over stock. This will make your bike accelerate much quicker. In theory a numerically higher gear ratio will result in better acceleration, while a numerically lower gear ratio helps top end/speed. -1/+2, is the max you want to go if you ride your bike on the highway. This will still put 75 MPH under 8k RPM, which is as high as Yamaha recommends for extended periods of time. Also remember higher RPMs generally result in lower fuel mileage.

------------------------------------------------------------------
Chain Replacement / Size
------------------------------------------------------------------
Chains and sprockets should be replaced as sets. This is because they wear to each other. If you have very low miles you can generally get away with doing -1/+0 on the stock chain. The length of the chain required will depend on your sprocket counts. This is why most chains come with extra length and you cut them down to the correct length.

------------------------------------------------------------------
Rivet Links
------------------------------------------------------------------
On a sport bike a rivet style master link is strongly recommended. It does take a special tool to do. It can be installed without the special tool, but the tool makes it much easier. If your chain breaks it will destroy things, the engine case, but I've seen them cut through swing arms like butter. You can not risk a chain failure. The clip style master links are not recommended for sport bikes, even if they are easier to install.

------------------------------------------------------------------
520 vs 525 vs 530
------------------------------------------------------------------
You'll hear lots of people speak of 520 conversion. 520 references the size of the chain and sprockets. 520 sprockets must be used with a 520 chain. Stock is 525, on the R6. The pitch and roller diameter is the same on the common sport bike sizes (520, 525, 530), the only difference is the width.

520 - 1/4" wide
525 - 5/16" wide
530 - 3/8" wide

520 is popular because it's smaller so it weighs less. Less rotational weight is always good. A quality 520 chain is strong enough for most people. The downside is with the smaller chain and sprockets, things will wear faster. So it's a trade off, less weight, but increased wear.


------------------------------------------------------------------
Sprocket Material
------------------------------------------------------------------
Front sprockets will be steel. The rear however is available in a Aluminum or Steel. Aluminum obviously is lighter than steel, but will wear faster. It should be noted there are several light weight steel sprockets out there that are very close to the weight of aluminum sprockets at this point. Also they make a steel toothed, aluminum center "hybrid" sprocket as well. To further complicate the options, there are hard anodized aluminum sprockets, which make the aluminum sprockets last much longer (lifespan is supposed to be close to steel).

------------------------------------------------------------------
Wear / Maintenance
------------------------------------------------------------------
How long your sprockets and chain last depend on how well you take care of them, material and size. I've achieved (and am still achieving) excellent wear out of my rear aluminum sprocket, but I stayed with the stock 525 size to help with that. Keep your chain clean and lubed are very important. Anytime you wash your bike, or ride it in the rain you need to relube your chain. I can't recommend Amsoil's Chain Lube enough, best stuff I've ever used. You can get it by contacting Bob here on the forum.

------------------------------------------------------------------
Speedometer Correction
------------------------------------------------------------------
If you change your sprockets your speedometer will be off. To correct this you will need a Speedo DRD. It is a plug and play installation, and easy to setup. I personally own both a SpeedoHealer and a SpeedoDRD, the SpeedoDRD is far superior. The SpeedoDRD is adjustable, so no matter what changes you make, you can always correct your speedometer.

------------------------------------------------------------------
Navigation
------------------------------------------------------------------
| Sprocket / Ratio Changes | Chain / Replacement Size | Rivet Links | 520 vs 525 vs 530 | Sprocket Material | Wear / Maintenance | Speedometer Correction | FAQ Index |
 
Save
Discussion starter · #226 · (Edited)
------------------------------------------------------------------
Sprocket / Ratio Changes
------------------------------------------------------------------
Arguably the best bang for your buck when it comes to modifications to your bike is sprockets. With sprockets you are able to change your gear ratio.

Sprockets are listed in tooth counts, Front Sprocket / Rear Sprocket. Stock is 16 / 45 for the 06+ R6. To find out the ratio, divide the two sprocket counts together.

Stock - 16 / 45 - 2.81
-1/+0 - 15 / 45 - 3.00
-1/+2 - 15 / 47 - 3.13

As a general rule of thumb, going down one in the front, is the same as going up 3 in the rear. The most popular swap is -1/+2. As you can see it's roughly an 11% increase over stock. This will make your bike accelerate much quicker. In theory a numerically higher gear ratio will result in better acceleration, while a numerically lower gear ratio helps top end/speed. -1/+2, is the max you want to go if you ride your bike on the highway. This will still put 75 MPH under 8k RPM, which is as high as Yamaha recommends for extended periods of time. Also remember higher RPMs generally result in lower fuel mileage.

------------------------------------------------------------------
Navigation
------------------------------------------------------------------
| Sprocket / Ratio Changes | Chain / Replacement Size | Rivet Links | 520 vs 525 vs 530 | Sprocket Material | Wear / Maintenance | Speedometer Correction | FAQ Index |
 
Save
Discussion starter · #227 · (Edited)
------------------------------------------------------------------
Chain Replacement / Size
------------------------------------------------------------------
Chains and sprockets should be replaced as sets. This is because they wear to each other. If you have very low miles you can generally get away with doing -1/+0 on the stock chain. The length of the chain required will depend on your sprocket counts. This is why most chains come with extra length and you cut them down to the correct length.

------------------------------------------------------------------
Navigation
------------------------------------------------------------------
| Sprocket / Ratio Changes | Chain / Replacement Size | Rivet Links | 520 vs 525 vs 530 | Sprocket Material | Wear / Maintenance | Speedometer Correction | FAQ Index |
 
Save
Discussion starter · #228 · (Edited)
------------------------------------------------------------------
Rivet Links
------------------------------------------------------------------
On a sport bike a rivet style master link is strongly recommended. It does take a special tool to do. It can be installed without the special tool, but the tool makes it much easier. If your chain breaks it will destroy things, the engine case, but I've seen them cut through swing arms like butter. You can not risk a chain failure. The clip style master links are not recommended for sport bikes, even if they are easier to install.

------------------------------------------------------------------
Navigation
------------------------------------------------------------------
| Sprocket / Ratio Changes | Chain / Replacement Size | Rivet Links | 520 vs 525 vs 530 | Sprocket Material | Wear / Maintenance | Speedometer Correction | FAQ Index |
 
Save
Discussion starter · #229 · (Edited)
------------------------------------------------------------------
520 vs 525 vs 530
------------------------------------------------------------------
You'll hear lots of people speak of 520 conversion. 520 references the size of the chain and sprockets. 520 sprockets must be used with a 520 chain. Stock is 525, on the R6. The pitch and roller diameter is the same on the common sport bike sizes (520, 525, 530), the only difference is the width.

520 - 1/4" wide
525 - 5/16" wide
530 - 3/8" wide

520 is popular because it's smaller so it weighs less. Less rotational weight is always good. A quality 520 chain is strong enough for most people. The downside is with the smaller chain and sprockets, things will wear faster. So it's a trade off, less weight, but increased wear.

------------------------------------------------------------------
Navigation
------------------------------------------------------------------
| Sprocket / Ratio Changes | Chain / Replacement Size | Rivet Links | 520 vs 525 vs 530 | Sprocket Material | Wear / Maintenance | Speedometer Correction | FAQ Index |
 
Save
Discussion starter · #230 · (Edited)
------------------------------------------------------------------
Sprocket Material
------------------------------------------------------------------
Front sprockets will be steel. The rear however is available in a Aluminum or Steel. Aluminum obviously is lighter than steel, but will wear faster. It should be noted there are several light weight steel sprockets out there that are very close to the weight of aluminum sprockets at this point. Also they make a steel toothed, aluminum center "hybrid" sprocket as well. To further complicate the options, there are hard anodized aluminum sprockets, which make the aluminum sprockets last much longer (lifespan is supposed to be close to steel).

------------------------------------------------------------------
Navigation
------------------------------------------------------------------
| Sprocket / Ratio Changes | Chain / Replacement Size | Rivet Links | 520 vs 525 vs 530 | Sprocket Material | Wear / Maintenance | Speedometer Correction | FAQ Index |
 
Save
Discussion starter · #231 · (Edited)
------------------------------------------------------------------
Wear / Maintenance
------------------------------------------------------------------
How long your sprockets and chain last depend on how well you take care of them, material and size. I've achieved (and am still achieving) excellent wear out of my rear aluminum sprocket, but I stayed with the stock 525 size to help with that. Keep your chain clean and lubed are very important. Anytime you wash your bike, or ride it in the rain you need to relube your chain. I can't recommend Amsoil's Chain Lube enough, best stuff I've ever used. You can get it by contacting Bob here on the forum.

------------------------------------------------------------------
Navigation
------------------------------------------------------------------
| Sprocket / Ratio Changes | Chain / Replacement Size | Rivet Links | 520 vs 525 vs 530 | Sprocket Material | Wear / Maintenance | Speedometer Correction | FAQ Index |
 
Save
Discussion starter · #232 · (Edited)
------------------------------------------------------------------
Speedometer Correction
------------------------------------------------------------------
If you change your sprockets your speedometer will be off. To correct this you will need a Speedo DRD. It is a plug and play installation, and easy to setup. I personally own both a SpeedoHealer and a SpeedoDRD, the SpeedoDRD is far superior. The SpeedoDRD is adjustable, so no matter what changes you make, you can always correct your speedometer.

------------------------------------------------------------------
Navigation
------------------------------------------------------------------
| Sprocket / Ratio Changes | Chain / Replacement Size | Rivet Links | 520 vs 525 vs 530 | Sprocket Material | Wear / Maintenance | Speedometer Correction | FAQ Index |
 
Save
Discussion starter · #233 · (Edited)
------------------------------------------------------------------
FlashTune Maps
------------------------------------------------------------------

------------------------------------------------------------------
FlashTune Verison 1.2.2.0 Only!
------------------------------------------------------------------
06-07 R6
Graves 06-07
MJS 06-07
1.2.2.0 Map with updated 1.5.4.0 similar tables 06-07 - (Load any PCV map into this)
My Custom Map 06-07 (old)
My Latest Custom Map 06-07 (new) (Less aggressive throttle)

08-11 R6
Graves 08-11
Leo Vince 08-11
MJS 08-11
1.2.2.0 Map with updated 1.5.4.0 similar tables 08-11 (Load any PCV map into this)
My Custom Map 08-11
My Custom Map 08-11, with 06-07 Throttle Settings*
*06-07 Throttle map is more linear, and you may find it less jumpy than the 08+ throttle settings.

------------------------------------------------------------------
FlashTune Verison 1.5.4.0 Only!
------------------------------------------------------------------
Graves 06-07
MJS 06-07

Graves 08-11
MJS 08-11


------------------------------------------------------------------
Navigation
------------------------------------------------------------------
| Choosing a Map | PCV Maps | PCV Maps with AutoTune Tables | PCIII Maps | Bazzaz Maps | FlashTune Maps | FAQ Index |
 
Save
Discussion starter · #234 · (Edited)
I've found people tend to actually easily create problems and dead spots in their powerband, by using the AutoTune. This section is how I use the AutoTune, it's my opinion, and what works well for me. This doesn't necessarily mean it's the best way.

------------------------------------------------------------------
Why AutoTune changes never stop
------------------------------------------------------------------
DynoJet leads you to believe after reach riding session you should look at the trims and accept them, and by doing this you will eventually reach a point where no more trims will be suggested. However this will never happen.

First your bike is constantly bouncing back and forth between a low load, and high load map. The bike uses several factors to determine which map to use. A couple examples (06-07 Stock ECU):

6000 RPM 20% Throttle
Low Load Map: 9
High Load Map: 46

6000 RPM 50% Throttle
Low Load Map: 18
High Load Map: 63

As you can see there are huge differences in the fuel maps. The AutoTune has no idea which map the ECM is using, it's just suggesting trims to achieve the AFR raito you have set. This means it will pretty much always suggest changes, as the amount of fuel your bike is using will constantly change.

Also this is a good reason to have separate maps for each gear, as every gear will need a different amount of fuel, especially due to the ram air effect at speed. With a single map the AutoTune will tend to go richer after highway trips, and then have lean back out for the lower gears. The factory ECM is also trying to adjust for these changes, further messing with things.

------------------------------------------------------------------
When to accept trims.
------------------------------------------------------------------
First, stop accepting trims, especially multiple times! It's best to use the trims as suggestions. However don't use these suggestions after riding it to work and back. Ride the bike for a while the AutoTune is making necessary changes (assuming it's within it's limits), so there is no hurry to accept the trims in your map. I would say generally ride it for a week at least. After that use your AutoTune trims as suggestions. Save your current map before accepting any trims or making modifications, I generally try and include the date in the maps name so I know which order they go in. This way you have a backup and can go back a step if need be. I generally only accept trims once or twice (if I accept them at all), after this I may make small changes, but I really don't ever accept trims after that. Continuing to accept trims, generally results in adding in "false positives". If you monitor the trim map especially after accepting the trims, you may find spots that keep want fuel, that keep maxing out the trim adjustment. These are generally false readings, due to fresh air being pulled straight through and into the exhaust. Generally you should have anything 50+ on your map anywhere, however 40s can be believable in the lower RPM range. You also shouldn't see a +46 in a cell right next to a -30. While there are some areas where there can be gaps between the fuel needed, it shouldn't be huge changes.

------------------------------------------------------------------
Using trims as suggestions
------------------------------------------------------------------
Using the trim table as suggestions rather than accepting them is actually very easy. Look at the trim tables, and find general areas, where the AutoTune is definitely seems to want to add / remove fuel. When adding fuel, select that area on your fuel map, and then add in fuel. Don't add as much as the AutoTune suggests everywhere, if in that range the lowest suggest change was a +5, add +5 to the entire area. Even if you have +20s in other spots. When removing fuel, I do so much more cautiously, removing only -1 or -2 at a time. Now if you continue to save all your maps, you should start to notice the AutoTune changes dropping off in those areas some. You may still get large suggestions, that's fine. However making these small changes like this, can prevent the AutoTune from skewing your map in a direction that causes your bike to run bad. Yes this method takes longer to get things sorted out, however I've found it results in a much better map, without weird dead spots in the RPM band.

------------------------------------------------------------------
Troubleshooting
------------------------------------------------------------------
Q: My AFR only shows 0.00
A: Make sure you have the CAN termination plug installed

Q: My AFR only shows 9.99
A: If it shows 9.99 at first, then goes to a live reading, this is normal. If it stays at 9.99 your O2 sensor maybe bad.

Q: I've enabled AutoTune but it never actually enables?
A: The AutoTune has several protection functions built in, one of which is it will disable itself it reads something really lean. This prevents it from trying to correct around a serious problem, or a faulty sensor.
 
Save
your just going off one (high or low) load map correct?
 
Save
Discussion starter · #236 ·
your just going off one (high or low) load map correct?
You mean since I flashed my ECM? Yes, when I flashed the ECM, I disabled the low load map entirely. So my bike is always using the high load map. This pretty drastically reduced the changes my AutoTune has to make.
 
Save
I have the PCV and Autotune, with the temp sensor tapped into. Now my bike is running a much higher temperature and won't go anywhere below 201 degrees, no matter what speed im riding at. And jump to 241 sometimes then slowly work its way down to like 205. I've been racking my brain on why, and still haven't figured it out.
 
Discussion starter · #238 ·
Did the problem start as soon as you tapped into the wire?

Does the bike start out with the temp higher than normal, and rise, or does it just start out at 201?

Does your PCV software reading match what the gauge is saying?

Have you checked your coolant level, or temped it to verify the temperature is correct?

How did you tap into the wire? The taps can sometimes create problems, or even break the wire all together.

You don't want the thing getting that hot, personally I wouldn't ride it until it was sorted out.
 
Save
Well at first I didn't and it jumped up on me one time when I was riding. So then I tapped it and it seemed a little high and I was figuring it was because I was a bit lean. But still didn't come down below 205. So I went back and checked my connections and figured I should change out the wire I was using, and I'm using wire taps that ate 2-1 connections. It seems fine warming up and idles at a temp of 210ish which was always normal, and on the PCV it says the temp is equivalent to 190ish, but when I ride it jumps up there, the guage will say a high temp but it doesn't feel or seem warmer than normal. I haven't checked the temps yet with a thermometer, I don't have access to one yet, flushed my coolant and I'm using engine ice currently. Levels do seem fine but maybe I didn't get quite a through flush and there's some old in there still and mixing with the engine ice which you don't want. I'm still unsure.
 
Discussion starter · #240 ·
Mixing antifreeze can have weird effects. If it's turning to gel, it would definitely run hot. Engine ice doesn't really say what will happen, just they don't recommend it. However I can't see how you would have had enough regular antifreeze left in there to really cause a problem.

Did you ride it after the switch to engine ice? Are you sure you got all the air bubbles out?

I would first eliminate that wire tap, to make sure you have somehow induced some resistance or something weird, and are just making it read incorrectly.
 
Save
221 - 240 of 456 Posts
Status
Not open for further replies.
You have insufficient privileges to reply here.