Yamaha R6 Forum: YZF-R6 Forums banner
Status
Not open for further replies.
161 - 180 of 456 Posts
Discussion starter · #161 · (Edited)
------------------------------------------------------------------
Choosing a Map
------------------------------------------------------------------
There is generally not one map that just works for everyone. When using a map that you download you really have to try different ones and see what gives you the best results. Just because you have a Leo exhaust doesn't necessarily mean the Leo map will work best for you, you might find the Graves works better.

I'm not responsible for anything that could happen to you, your bike, etc from using these. Use at your own risk.

All the maps except the MJS ones are directly from the DynoJet website, you can download them all there if you want. To try and make it easier, I've selected the most commonly used maps. (More will be added, again this is a work in progress)

------------------------------------------------------------------
Navigation
------------------------------------------------------------------
| Choosing a Map | PCV Maps | PCV Maps with AutoTune Tables | PCIII Maps | Bazzaz Maps | FlashTune Maps | FAQ Index |
 
Save
Discussion starter · #162 · (Edited)
Save
Discussion starter · #163 · (Edited)
------------------------------------------------------------------
PCV Maps with AutoTune Tables:
------------------------------------------------------------------
MJS Map - AutoTune AFR Table filled in
MJS Map - AutoTune AFR Table, Maps for each gear, 500 RPM Resolution *
MJS Map - AutoTune AFR Table, Maps for each gear, 250 RPM Resolution *
Zero Map - AutoTune AFR Tables filled in

* Speed Sensor Wire must be hooked up to the PCV and Gear Calibration done.

------------------------------------------------------------------
Navigation
------------------------------------------------------------------
| Choosing a Map | PCV Maps | PCV Maps with AutoTune Tables | PCIII Maps | Bazzaz Maps | FlashTune Maps | FAQ Index |
 
Save
Discussion starter · #164 · (Edited)
Save
Discussion starter · #165 · (Edited)
------------------------------------------------------------------
Bazzaz Maps:
------------------------------------------------------------------
Akrapovic Map
Graves Map
MJS Map
Zero Map
These Bazzaz Maps, I converted over from the PCV maps.

------------------------------------------------------------------
Navigation
------------------------------------------------------------------
| Choosing a Map | PCV Maps | PCV Maps with AutoTune Tables | PCIII Maps | Bazzaz Maps | FlashTune Maps | FAQ Index |
 
Save
Discussion starter · #166 · (Edited)
------------------------------------------------------------------
Exhaust Basics 06+:
------------------------------------------------------------------
On the 06+ R6 the slipon really doesn't do anything other than house the EXUP and slightly change the tone of the bike. Just installing a slip on won't make the bike any louder. In fact you can take the slip on completely off and the bike still won't be any louder.

The problem is the muffler and catalytic converter is built into the header. The muffler is the big box under your bike, and the catalytic converter is built into the header tubes, in front of that box. To remove the muffler you must install a new header or mid-pipe.

This image will help some:

Image


------------------------------------------------------------------
Navigation
------------------------------------------------------------------
| Exhaust Basics 06+ | Midpipes | Headers | Headers vs Midpipes | EXUP | Smog Block Offs | EXUP Explained | FAQ Index |
 
Save
Discussion starter · #167 · (Edited)
------------------------------------------------------------------
Midpipes:
------------------------------------------------------------------
Clamp on - Removes just the muffler.
Weld on - Removes both the muffler and catalytic converter.

On mid-pipes, they are essentially all the same, the only one I would avoid is the TTuner. The MJS, Olson, M4 are all good designs, and will be similar. Personally I always recommend MJS just because Mike is a great guy to deal with, if you call him he always gives you an honest answer. Not to mention, if you call and are ordering several things, he'll usually work you up some sort of package deal

------------------------------------------------------------------
Navigation
------------------------------------------------------------------
| Exhaust Basics 06+ | Midpipes | Headers | Headers vs Midpipes | EXUP | Smog Block Offs | EXUP Explained | FAQ Index |
 
Save
Discussion starter · #168 · (Edited)
------------------------------------------------------------------
Headers:
------------------------------------------------------------------
As for headers, Graves, Akrapovic, Leo Vince, Yoshimura, Terminogi are all big names in headers. Probably in the order listed, Graves and Akra being slightly above the rest. Arrow is a good name for "race" headers that are "affordable". Some headers have clearance issues with race body work, so if you plan on running race plastics, make sure what you buy will work. Most of the exhaust manufacturers also offer a Titanium version of their exhaust, titanium is lighter. For most unless you are racing the weight savings isn't worth the additional cost.

MJS Header - This is the route I went, factory header with the weld on mid-pipe already installed. I do quite a bit of welding and fabricating, and still chose to let Mike @ MJS do the work, I wanted to just bolt the header on, not weld it back together.

05 Header Swap - You can use the 05 R6S Header, this isn't a bolt on though, you'll still need to cut the header down some, and use an adapter to make your slip on fit, and a bung welded in for an O2 sensor if you need one. This can be the cheapest route, but I'd prefer the MJS Header or Midpipe. It should be noted that the 05 Header will have clearance issues with 08+ plastics, and race body work.

------------------------------------------------------------------
Navigation
------------------------------------------------------------------
| Exhaust Basics 06+ | Midpipes | Headers | Headers vs Midpipes | EXUP | Smog Block Offs | EXUP Explained | FAQ Index |
 
Save
Discussion starter · #169 · (Edited)
------------------------------------------------------------------
Header vs. Mid-pipes / MJS Header:
------------------------------------------------------------------
The factory header is actually designed very well, the factory had to compromise and make them with a catalytic converter and muffler, once these are removed the header performs very well. Pretty much either route will give you the same amount of power. Dyno charts here.

------------------------------------------------------------------
Navigation
------------------------------------------------------------------
| Exhaust Basics 06+ | Midpipes | Headers | Headers vs Midpipes | EXUP | Smog Block Offs | EXUP Explained | FAQ Index |
 
Save
Discussion starter · #170 · (Edited)
------------------------------------------------------------------
EXUP:
------------------------------------------------------------------
The EXUP works by helping to keep exhaust velocity up which helps with low end torque and power. The EXUP valve is built into the factory slip on, when going to an aftermarket slip on you must do something to eliminate the EXUP. Some people leave the EXUP servo in there, and just let the cables hang (they must be able to still move freely). If you wish to remove the servo, you can get an EXUP elinimator, which would save some more weight. There are also some schematics floating around for home made servo eliminators too if you are good with electronics.

------------------------------------------------------------------
Navigation
------------------------------------------------------------------
| Exhaust Basics 06+ | Midpipes | Headers | Headers vs Midpipes | EXUP | Smog Block Offs | EXUP Explained | FAQ Index |
 
Save
Discussion starter · #171 · (Edited)
------------------------------------------------------------------
Smog Block Offs
------------------------------------------------------------------
Also with header or mid-pipe you really should get some smog block off plates. These will prevent alot of popping and backfiring especially under deceleration, and it will make sure your O2 sensor is getting a proper AFR reading, or if you don't run an O2 sensor, that when you have a dyno tune done, they get an accurate AFR reading.

------------------------------------------------------------------
Navigation
------------------------------------------------------------------
| Exhaust Basics 06+ | Midpipes | Headers | Headers vs Midpipes | EXUP | Smog Block Offs | EXUP Explained | FAQ Index |
 
Save
Discussion starter · #172 · (Edited)
------------------------------------------------------------------
EXUP Explained
------------------------------------------------------------------
So there seems to be a lot of questions about how the EXUP actually works. In the exhaust system as each cylinder fires, the exhaust system will get "puffs" of exhaust gas. These puffs actually create a vacuum behind them which creates a scavenging effect. The key is to keep exhaust gas velocity up, to keep this scavenging effect going. Scavenging helps "suck" gases out, and will prevent exhaust gases from re-entering the combustion chamber. Now all this pretty much goes out the window at higher RPMs, as the exhaust gases tend to be a steady flow rather than "puffs". Once you approach that "steady flow" pretty much bigger the better on the pipes, you just need to get the exhaust gas out fast. The EXUP is sort of a compromise, it adds a "restriction" which decreases pressure, and increases velocity. If it helps think of this "restriction" as a way to to shrink the pipe, it's all to keep exhaust velocity up to help with low end power. This is also why the general rule of thumb is smaller exhaust pipes (within reason) help low end power/torque, while larger pipes increase top end power. The EXUP is sort a way to have "different sizes of exhaust piping" in the same exhaust.

------------------------------------------------------------------
Navigation
------------------------------------------------------------------
| Exhaust Basics 06+ | Midpipes | Headers | Headers vs Midpipes | EXUP | Smog Block Offs | EXUP Explained | FAQ Index |
 
Save
Discussion starter · #173 · (Edited)
------------------------------------------------------------------
Calibrating Throttle Position
------------------------------------------------------------------
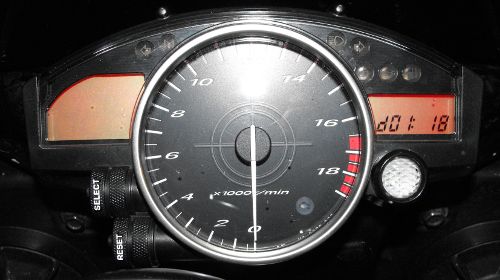
By default the throttle position will be fairly close on the PCV software, however it still needs calibrated to get an accurate reading. The instruction of course indicate this must be done on a dyno because of the throttle by wire. However this is not true, you just simply need to enter diagnostic mode on your bike. In diagnostic mode the throttle bodies will open fully, allowing you to properly calibrate the throttle position.

- Hook your laptop into the PCV.
- Press and hold the Select and Reset buttons on the gauge cluster.
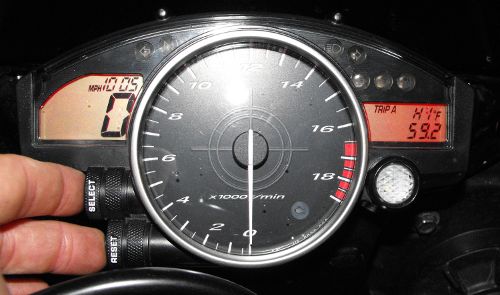
- Turn the key on (kill switch in run position). (Still holding both Select and Reset buttons) Your gauge cluster should have H1 up in the right hand corner:

Image


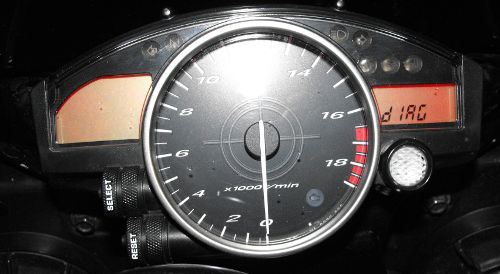
- Continue to hold the Select and Reset buttons until dIAG appears on the gauge cluster (Should happen within 8-10 seconds).

Image


- When dIAG appears on the gauge cluster, release both the Select and Reset buttons.
- Now to "activate" diagonostic mode, you once again need to press and hold both the Select and Reset buttons, except this time the screen should change within a couple seconds.
- At this point you should see d01 : XX, d01 is the test mode for the TPS sensor (For the Throttle Valves).

Image


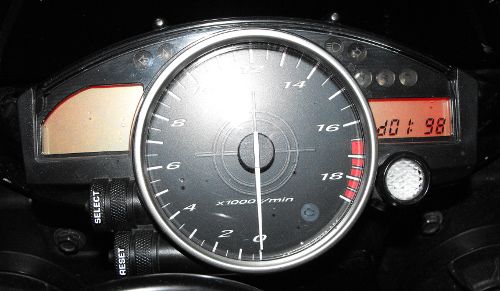
- As you twist the throttle the number following d01 should climb. Normal closed values should be between 12-21, while full throttle should be between 97-106:

Image


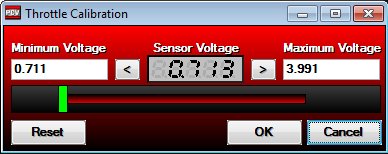
- Now in the PCV software, choose "Power Commander Tools", then "Calibrate", then "Throttle Position".

Image


- Now click reset, the min and max voltages should both be the same now, roughly 0.7 volts.
- Now twist the throttle all the way open. The max voltage should increase to roughly 3.9 volts.
- Click "Ok"
- Finally click "Send Map" to send everything back to the PCV.
- Now while still in dIAG mode you should be able to twist the throttle and and see 100% in the PCV software.
- To exit dIAG mode, simply turn the key off.

If you run into problems you can attempt to use one of the other test functions. Here are the other modes that will open the throttle blades all the way with minimum and maximum values:

01 - TVS signal, 12-21 - 97-106
13 - TVS Signal 2, 9-23 - 94-106
14 - TPS Signal, 12-22 - 97-107
15 - TPS Signal 2, 10-24 - 95-109

------------------------------------------------------------------
Navigation
------------------------------------------------------------------
| Calibrating Throttle Position | Enabling AutoTune | Setting Target AFR Tables (Also applies to Bazzaz) | Firmware Updating | Separate Maps for each Gear | FAQ Index |
 
Save
Discussion starter · #174 · (Edited)
------------------------------------------------------------------
Enabling AutoTune
------------------------------------------------------------------
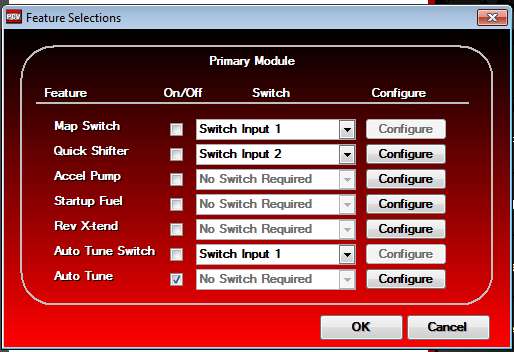
Go to "Power Commander Tools" then "Configure", and then "Feature Enables and Input Selections", or hit Ctrl + F. This will allow you to enable various features and add-on units for the PCV. To enable the AutoTune, first check the box next to AutoTune. Do NOT check the Auto Tune Switch box, above the AutoTune box, that is only if you wish to turn the AutoTune on/off with a switch. Then click configure to adjust the AutoTune settings.

Image


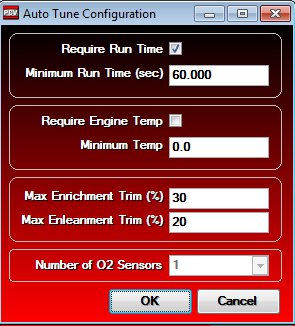
Under the AutoTune Configuration window, you want to make sure "Require Run Time" is checked, and you have 60 seconds there. O2 sensors need some time to "pre-heat" to read properly, 60 seconds is generally enough time for an O2 sensor to preheat themselves to read properly. Requiring a minimum engine temp requires the coolant temperature sensor to be wired to the PCV (I don't use this option). The Max Enrichment Trim, and Enleanment Trim is the max amount the AutoTune can adjust, be default this is 20% / 20%. Limiting what the AutoTune can do just provides a saftey net should the sensor go bad. I would not recommend running more than 20% Enleanment Trim.

Image


------------------------------------------------------------------
Navigation
------------------------------------------------------------------
| Calibrating Throttle Position | Enabling AutoTune | Setting Target AFR Tables (Also applies to Bazzaz) | Firmware Updating | Separate Maps for each Gear | FAQ Index |
 
Save
Discussion starter · #175 · (Edited)
------------------------------------------------------------------
Setting Target AFR Tables (Also applies to Bazzaz)
------------------------------------------------------------------
The ideal, or stoichiometric air fuel ratio (AFR) is 14.7:1. However this "ideal" number can vary a lot based on many factors. Just the additives they put in todays fuels can knock this down to as low as 14.1:1. Anything greater than 14.7 is consider lean, less than 14.7 is consider rich.

Lean vs Rich:
Lean mixtures create tons of extra heat. So much heat in fact it's actually possible to melt holes in pistons, cause detonation, etc, all sorts of damage (particularly in higher RPMs). Rich mixtures are cooler and help protect parts, especially in the higher RPMs. Rich mixtures also have their downsides too. Rich mixtures can cause carbon buildup in the cylinders (can be a cause of detonation), tends to foul plugs quicker, and can "wash out" the rings (in very rich conditions) (Washing out the rings is where the fuel actually "cleans" all the oil off the cylinder walls, and you end up with fuel that seeps past the rings into the oil, resulting in lower compression and excessive wear to the motor). Now in general, lean mixtures (lean in this case being the safe side of 14:7:1, but as close to 14.7:1 as possible) can result in more power, better fuel economy, and better throttle response. The old standby was 13:1 made the most power at higher RPMs, while still protecting parts. That being said, there are so many variables, that these generalities don't apply to all applications. In fact our bikes tend to prefer much richer mixtures, and also make more power with more fuel, at least to a point.

My Recommendations for Targets
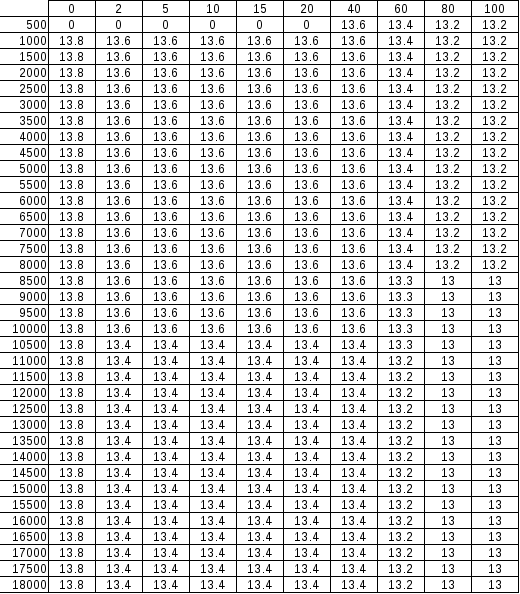
There are many different "schools of thought" for this, this "section" is my opinion and is based on what I have found to work for me both by feel and dyno results. My first recommendation is the leanest you should ever go anywhere on your map is 14. Second I don't recommend anything leaner than 13.2 after 9000 RPM starting at 80% throttle and greater. Generally to still get some fuel economy out of the bike, you want to be leaner and progressively get richer as throttle is applied and RPMs increase. Generally I would say 13.6 is a good for the cruising area, and gradually increase that number to 13 as the RPMs and throttle is increased. To give you an idea, this is an AFR table that worked well for me:

Image


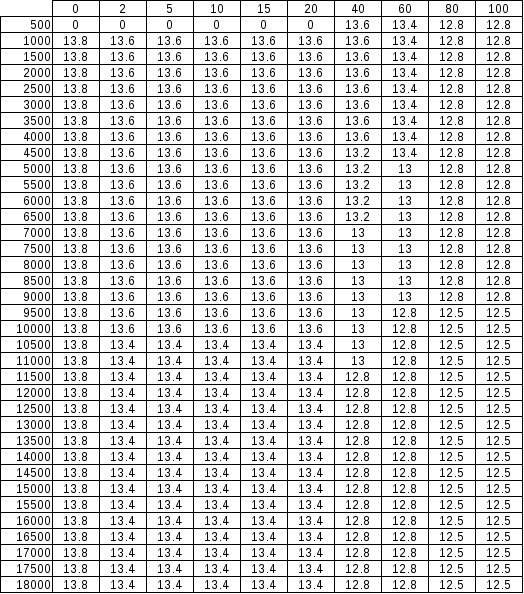
While the above map worked well, I've since found these bikes like fuel. This map is still meant to be sort of a compromise, still getting decent fuel economy while cruising around town, but still have the extra power up high. The richer mixtures on these bikes I've found to be worth roughly 1 hp in several spots, and helps broaden the power curve slightly.

Image


Troubleshooting and Tips
To run any type of AutoTune device, wether it be the AutoTune for the PCV, or the zAFM from Bazzaz, you need smog block off plates. Otherwise you won't have accurate AFR readings. These are a must, and they are not expensive.

Start with a base map, not a zero map. Then don't accept any trims right away (Bazzaz users must accept the trims for them to do anything, PCV users give the AutoTune time to work it's making live changes). The AutoTune will suggest trims after your first ride, you need to get a good average. I've only accepted the trims once since owning the AutoTune module. The goal, in my opinion, is to get the map close enough that the AutoTune can adapt the fuel map for changing environments. So anywhere you see the AutoTune maxing out it's adjustment increase the fuel on the base map there (Or accept those trims, after reading the next tip). Also don't accept trims on days where the temperature is abnormally hot or cold.

If you are using a base map and the AutoTune constantly wants to max out the fuel adjustment, you may be getting a false reading, do NOT continue to accept these changes. This can happen at lower RPMs, are at points where the frequency of the exhaust and valve overlap cause fresh air to be sucked right into the exhaust, for most exhaust systems on the R6 this is generally somewhere around 5000-6000 RPM. Trying to correct for a false reading will never work, the bike will just run super rich in that spot, despite the "lean" reading. At lower RPMs sometimes it's even necessary to disable the AutoTune by putting "0"s in the Target AFR cells (I have not needed to ever do this). Anywhere else, I suggest leaving the AutoTune enabled and just don't ever accept those trims.

I strongly recommend if running the PCV to create separate maps for each gear. Without doing this your AutoTune trims will constantly be changing and pretty much all over the map. The amount of fuel needed in first gear is quite a bit different than what is needed in sixth gear.

If you run into a jumpy throttle, or an area that seems to lose power for a moment, try adding fuel. Adding fuel definitely helps smooth things out on these bikes. Now it is possible that you can get to much fuel and cause a "dead" spot, but most of the time more fuel will help your problem.

If running the PCV AutoTune I suggest leaving it on all the time this ensures your bike will always be running at peak performance. It allows your bike to adjust as your riding environment changes. Now you also have to realize though, wide band O2 sensors can have a shorter life span than regular O2 sensors. Race gas in particular will tend to chew through sensors in a hurry. Rich mixtures also slowly kill the sensors. Most people should get at least several seasons out of an O2 sensor (I've got 2 years on mine so far, still no problems). Replacement sensors are roughly $80 at the time of writing this. There is an O2 sensor test function described in the AutoTune instructions. A failing O2 sensor will typically start to become slow to respond to changes, especially noticeable at the higher RPMs. For the Bazzaz zAFM users, once you're happy with your map, completely removing the O2 sensor will help prevent any wear and tear from being placed on the sensor, ensuring it's accurate the next time you need to use it (since the Bazzaz does NOT make live changes, it doesn't need to be in there except when you are "tuning").

------------------------------------------------------------------
Navigation
------------------------------------------------------------------
| Calibrating Throttle Position | Enabling AutoTune | Setting Target AFR Tables (Also applies to Bazzaz) | Firmware Updating | Separate Maps for each Gear | FAQ Index |
 
Save
Discussion starter · #176 · (Edited)
------------------------------------------------------------------
Firmware Updating:
------------------------------------------------------------------
Since a new firmware is now out for the PCV, I figured a "how-to" update the firmware on the PCV was in order. There have been a couple different firmwares released since the PCV was released, so depending on where you bought your PCV you could have the initial firmware on it (Mike @ MJS updates the firmware on the PCVs before shipping them out usually). Firmware is just the software on the PCV, updating it usually is to enable new features, and in some cases fix problems (So far I've only seen firmware updates to support new features for the PCV, the latest adds some functionality to the ignition module). You can download the latest PCV firmware on the PowerCommander under Downloads. To check and see what firmware you are running, in the PCV software, choose "View" and then select "Device Information" (Or just hit Ctrl + I).

Installing new firmware really is pretty simple, however as with updating the firmware of any device, it's possible to "brick" your device. To make sure you don't run into any problems, you'll want to take a few precautions. First don't even unplug anything while the firmware is being flashed. Also when using your laptop, make sure the battery isn't half dead (don't want it dieing in the middle of a flash). Once you start this process you must finish it, so don't use a flakey computer.

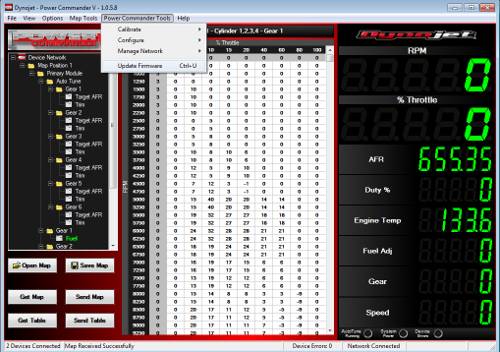
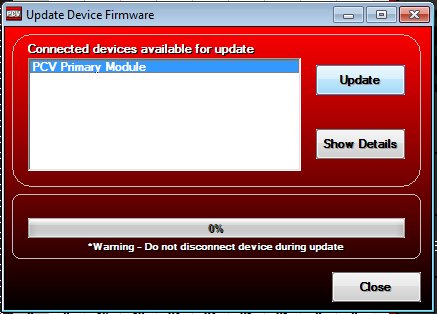
First hook your computer up to the PCV, and turn the bike on (not running, just key on). Then go to "Power Commander Tools" and choose "Update Firmware" (Or hit Ctrl + U).

Image


That will open up the box pictured below. Select the PCV Primary Module, and click the "Update" button. At this point you will need to navigate to the directory where you downloaded the PCV Firmware file. The file you downloaded will be a .zip file, make sure you extract the .pvu firmware file.

Image


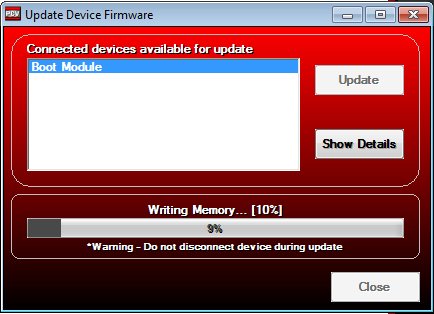
After choosing the file, it will go through a couple different processes, this will just essentially "disable" your PCV and put it in a "boot" mode so it can be flashed. It will temporarily act like it's done and you will notice now instead of showing PCV Primary Module, it now says "Boot Module". Select "Boot Module" and click the "Update" button again, again choose the firmware file you downloaded and selected the first time. This time it will actually write the firmware to the PCV. Definitely do not unplug anything during this process.

Image


After it completes, you will now be running the latest firmware.

------------------------------------------------------------------
Navigation
------------------------------------------------------------------
| Calibrating Throttle Position | Enabling AutoTune | Setting Target AFR Tables (Also applies to Bazzaz) | Firmware Updating | Separate Maps for each Gear | FAQ Index |
 
Save
Discussion starter · #177 · (Edited)
------------------------------------------------------------------
Seperate Maps for each Gear
------------------------------------------------------------------
If you have an AutoTune, making a map for each gear is strongly recommended. This will prevent higher speed runs or higher gears from skewing your table rich temporarily then waiting for the AutoTune to lean it back out for the lower gears. Without this you'll find your AutoTune pretty much always wanting to make fairly radical swings to the fuel table to achieve the correct AFR.

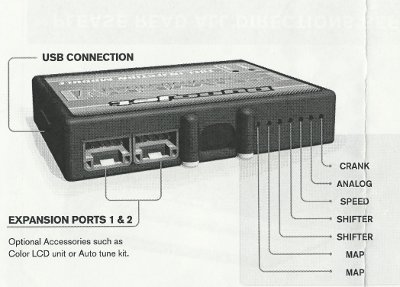
To enable different maps based on gear you need to hook the speed sensor wire into the PCV. If you need help on removing the tank to get to these wires, you can use my PCV Installation writeup. The speed sensor wire you need to tap into, at least on my 07 R6 is the pink wire (this will be different if you have a Speedo Calibrator of some sort), this connector is under the gas tank. I ended up tapping into the SpeedoHealer harness rather than the factor wiring. For the SpeedoHealer, you need to tap the Green wire (Blue is connected to the pink, but that's signal in, we need signal out in this case). If you have a speedo DRD or something and the colors are different than the SpeedoHealer than you want to connect to the other side of the pink wire, which is white with a yellow tracer. If you don't have any kind of SpeedoHealer or SpeedoDRD, you can connect to the pink wire.

Image


Now notice the blue and green wires running to the PCV. Green is my signal from the speed sensor. Blue is the signal I added from the coolant temp sensor. Tapping into the coolant temperature sensor can allow you to tune differently based on temperature, or enable/disable the AutoTune based on coolant temperature and not just time. I'll admit for my purposes I really didn't need this, but since I had everything apart, I decided to just go ahead and do it just in case. The temperature sensor wire is Green with a White tracer on the small ECU plug, should be pin #26.

Image


Once you have found the correct wires, they must be connected to the PCV:

Image


Once all the wiring is done, you must enable it in the PCV software. Go to "Map Tools", then "Advance / Demote Map". Here you must change "Fuel Tables (TPS)" to "Gear Advanced", and if running a AutoTune, "Target AFR Tables" to "Gear Advanced". This will give you both a table for each gear, and each gear will have it's own AutoTune table. NOTE, when you do this it will erase your entire table, so make sure you save your old map first. Save the map you have made now with tables for each gear. Then open your old map, select the whole table, and copy it with Ctrl + C, then open the new map you made, and paste it into each gears fuel table using Ctrl + V. You'll need to do the same thing for the AFR tables as well if using an AutoTune. Or you can download a map that has this already setup.

Image


You can also adjust the fuel map every 250 RPM, not just in 500 RPM increments (Picture above in the Advance / Demote Map). This isn't necessary, but does give the ability to adjust your tune a little further.

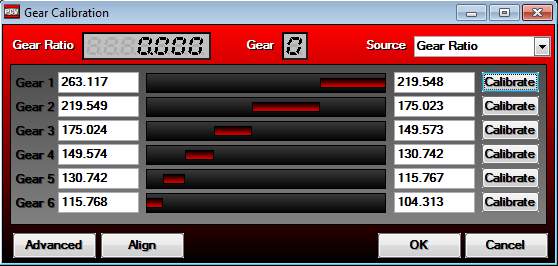
The final step is calibrating the speed sensor which is pretty easy, just had it on the stand and you hold the throttle as steady as possible, and just go through the gears, clicking calibrate in the corresponding gear.

Image


If you hooked up the coolant temperature sensor wire to the PCV, it will also need to be calibrated. Calibrating the coolant temperature sensor was easy to, just clicked enabled and left the values at the default settings, everything worked right away.

This originally started because after higher speed rides my AutoTune would trim my fuel table rich, then when I went back to "normal" street riding it would be rich for a short period while the AutoTune leaned it back out. Having a fuel table for each gear should eliminate these constant changes being needed. Or at least make it so such drastic trims are not needed all the time. As for converting to the 250 RPM increments, that should also allow me to smooth out my AFR a little and power band. It will definitely take some time to tweak it, but should be worth it in the end. For right now, I have converted the MJS Map over to the 250 RPM increments, then will just let the AutoTune trim as necessary.

This definitely has potential though. Another idea I had was to lean out the cruising area some just in 6th gear, that way only 6th gear at highway speeds would be affected (improved fuel economy for commutes), any other gear would not be affected, and on the rich side of "safe".

------------------------------------------------------------------
Navigation
------------------------------------------------------------------
| Calibrating Throttle Position | Enabling AutoTune | Setting Target AFR Tables (Also applies to Bazzaz) | Firmware Updating | Separate Maps for each Gear | FAQ Index |
 
Save
Discussion starter · #178 · (Edited)
------------------------------------------------------------------
Install Section:
------------------------------------------------------------------
While this section will become more detailed as I have time to work on it, and add pictures, for the moment, it will be more general and include options and tips to complete these installs.

------------------------------------------------------------------
Navigation
------------------------------------------------------------------
| Smog Block Off Plate Install | Header Install | FAQ Index |
 
Save
Discussion starter · #179 · (Edited)
------------------------------------------------------------------
Smog Block off plates
------------------------------------------------------------------
Torque Specs:
Smog Plate Bolts - 7.2 ft-lbs - Loctite Recommended (Blue / Medium)

There are two methods of installing smog block off plates, the air box method, and the radiator method. Note that no matter which way you choose removing the fuel tank is still pretty much mandatory to plug off the air box side. Also as a heads up, the fuel tank does have a check valve, so you can disconnect the line and only a little gas will leak out, draining the tank is not necessary.

Air Box Method-
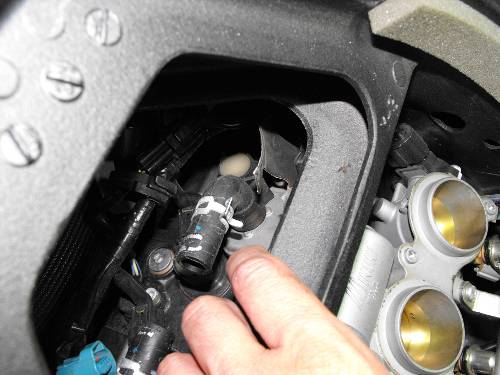
Once you remove the fuel tank, you will be able to completely remove the air box. This will then allow you to remove a small plastic panel in the frame that will allow you to access the spark plugs, and smog plates.

Image


This method can be very time consuming as the factory bolts do have loctite on them and won't come out easy. It is critical that you get your allen wrench in the bolts square, and completely to prevent stripping the heads.

Radiator Method
Removing the radiator does require you to take the lower half of the bike apart too. This method is more work, but I feel that it makes the job easier, and therefore worth the extra work. Also it gives you a chance to change your antifreeze (supposed to be changed every 2 years, or 16k miles which ever comes first), and allows easy access to the spark plugs if it's time for replacement (spark plugs are replaced every 8k miles).

Image


Finalizing the Install:
There is no "gasket" for the smog plates, there is a rubber seal around the reed valves that seals against the smog block off plates. Also note that several of the block off plates sold are directional. Graves plates for example have a machined out area to clear the screws in the reed valves, if you install them backwards, they won't seal, and you'll have a bunch of extra noise from them. On the Graves plates if you are sitting in front of the bike facing the motor the "G"s should be readable (not upside down). The solenoid (the one the hoses run to) that is attached to the plastic panel in the frame came be completely removed, just unplug it and remove the push pin holding it in. Also the plates should have come with a rubber cap to cap off the port in the air box that used to go to this system.

------------------------------------------------------------------
Navigation
------------------------------------------------------------------
| Smog Block Off Plate Install | Header Install | PCV Install | New Grips | Repacking a 06+ R6 GYTR slip-on
| FAQ Index |
 
Save
Discussion starter · #180 · (Edited)
------------------------------------------------------------------
Header:
------------------------------------------------------------------
Torque Specs:
Header Flange Bolts - 14 ft-lbs

Removing the header is actually pretty straight forward. You'll need to at least remove the right lower half of the body work. Also note that Yamaha recommends replacing the header gaskets anytime the header is removed. That being said, most people reuse the gaskets with no problems. Remove the slip on and unhook the EXUP cables first. Just take the center bolt out of the EXUP and remove the "disc" the cables are hooked to, this will make it easier to disconnect the cables. Once that is out of the way simply unbolt the header. You should find two bolts in the rear, on the muffler (large box), plus the eight nuts on the flanges.

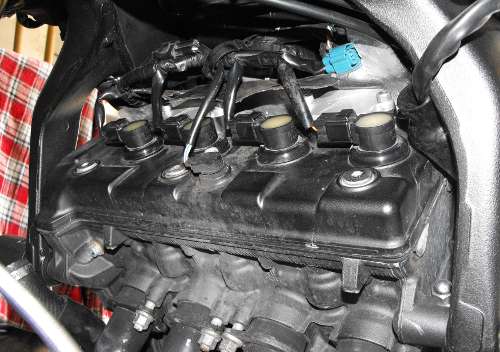
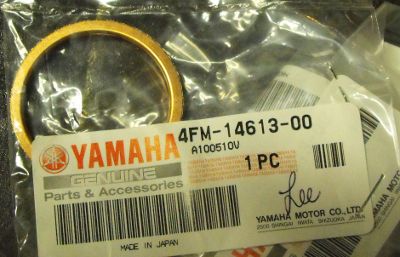
First when you remove the header locate the exhaust gaskets, they will either be stuck to the header, or most likely you'll find they are still on the head, but you need to make sure they are all in place for the installation of the new header, or to make sure you don't double gasket something if installing new gaskets. The exhaust gaskets are just small copper looking rings, they are roughly 3/16"-1/4" thick:

Image


Once you have all the gaskets and new header in place, it's just a matter of bolting the thing back together. Make sure you are tightening the exhaust flanges evenly, and properly torquing them.

------------------------------------------------------------------
Navigation
------------------------------------------------------------------
| Smog Block Off Plate Install | Header Install | PCV Install | New Grips | Repacking a 06+ R6 GYTR slip-on
| FAQ Index |
 
Save
161 - 180 of 456 Posts
Status
Not open for further replies.
You have insufficient privileges to reply here.